_01JMZ4H43P2JR7Z62M1XDT4TBF.png)
Fomo Inline: The Gold Standard for Native Social Proof 💎
For high-growth brands and sophisticated retailers, social proof should be a seamless part of the user journey. Fomo Inline allows you to embed live data directly into your website’s UI. It doesn't "pop up" it lives natively on your page, providing a high-trust, frictionless experience.
This is a premium feature designed to complement your existing notifications, providing validation exactly where it matters most: next to your price, your "Add to Cart" button, or your signup form.
The CRO Advantage:
-
Native Authority: Inline proof feels like a built-in feature of your store, making the data feel like a factual, core part of the product’s value.
-
Frictionless Trust: By placing real-time data at the point of decision-making, you remove the "is this real?" anxiety without distracting the user.
- Usage Note: Every page load counts as one impression. For stores with high traffic on all PDPs, keep this in mind when managing your monthly plan limits.
The "Inline" Integration Trio ⚡️
Only three specific Fomo integrations are built to work with Inline mode:
Active Visitors: 44 people are currently viewing this product/page
Best for real-time urgency by displaying the number of people looking at any product or page any given time.
- Logic: Look back 30 mins or 24 hours.
- Select if you want the counter to count visitors on all pages or per page basis if you are placing the inline on product pages make sure to have the counter count per page basis.
- Set a Minimum Count (e.g., 3) so the element stays hidden unless you have enough visitors. No "0 visitors" messages allowed!
Custom Roundups: 13 people signed up in the last 24 hours
The most flexible option,
- Logic: Connect any source (subscriptions, reviews, signups)
- Look-Back Period: Set the counter in hours, ranging from 1 hour to 720 hours (30 days). This allows you to accumulate a large, impressive number of actions to display.
Page Stream: 12 people bought this in the last 24 hours
The specialized choice for E-commerce Product Pages (PDPs).
-
Inline Mode Only: This unique setting allows you to turn off the standard popup notification entirely, leaving only the Inline text active on the page.
-
Look-Back Flexibility: Show sales momentum from the last 3 hours, 24 hours, 1 week, or up to 30 days.
- Note: Page Stream is built for supported e-commerce systems (Shopify/BigCommerce and others) and is not recommended for custom-built or non-e-commerce sites.
🛠️ Step-by-Step Integration
1. Configure the Integration
First, select your integration (Page Stream, Active Visitors, or Custom Roundup) you must have them connected them by then.
Double check your settings, set your look-back periods and minimum thresholds and save your settings.

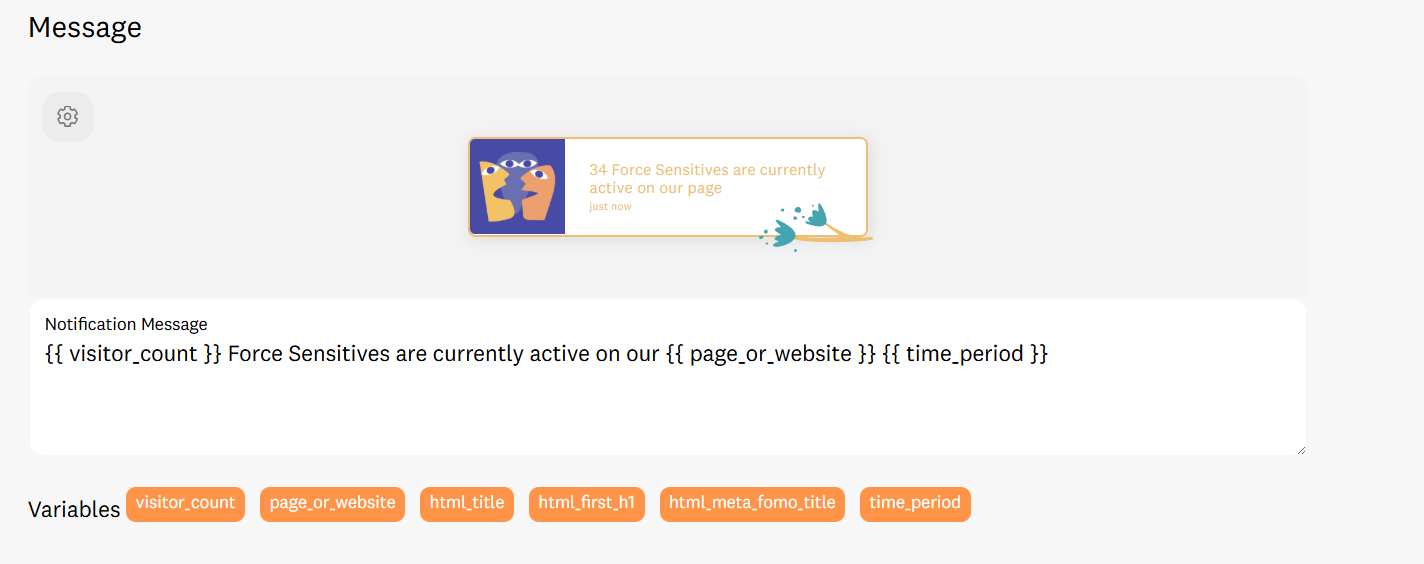
2. Perfect the Message
Click the Edit button on your Template. Use the available variables (like #{{ count }} ) to craft your message.
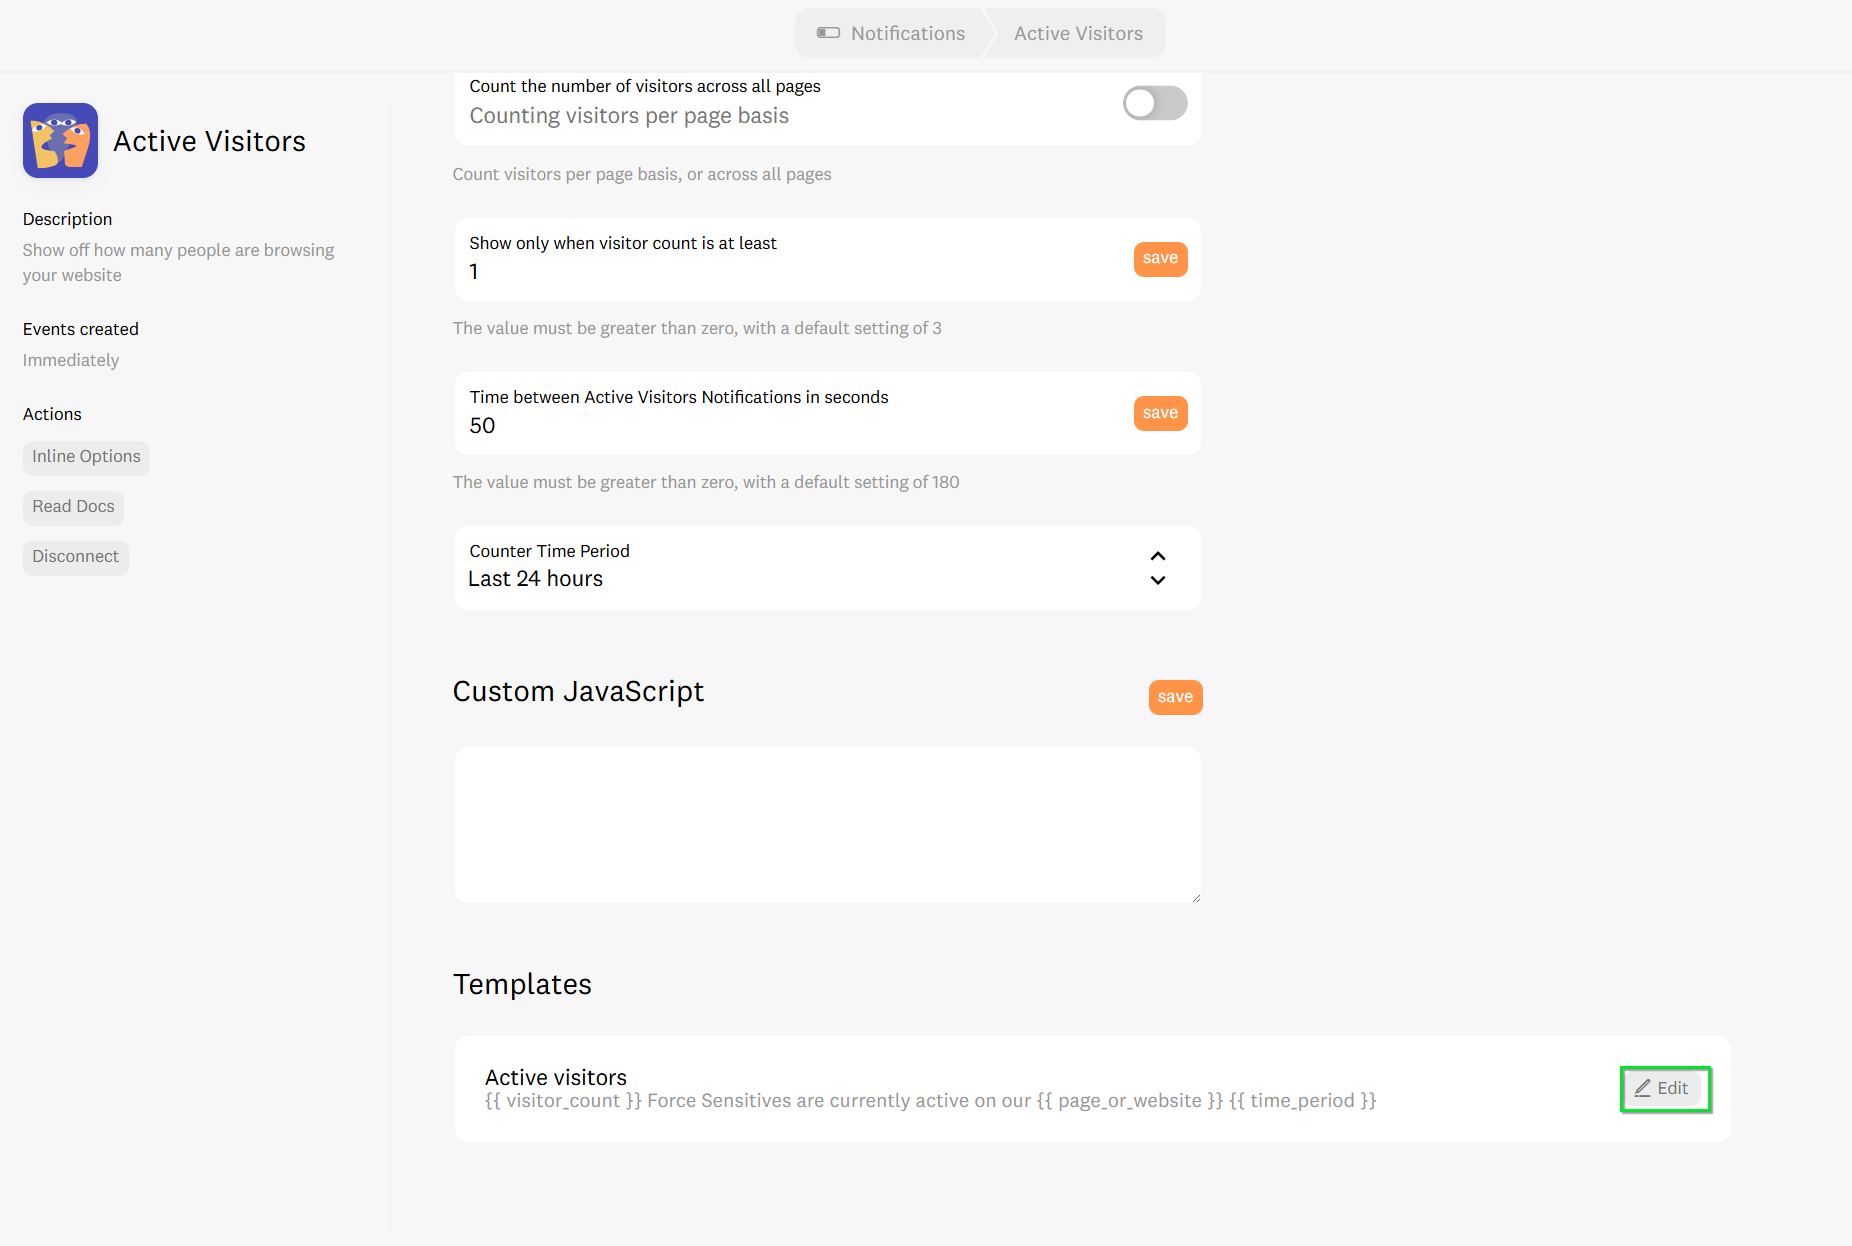
Spicy Tip: Instead of "people looking," try "🔥 #{{ count }} shoppers are eying this right now!"
3. Capture the Snippet
Go to the Inline tab within that integration’s settings. Here you will find your unique HTML snippet. Copy this code; you will need it for the next step.
🚀 Deployment: Adding to Your Store
For Shopify Users
Shopify is our most common environment, but it requires specific care.
-
Go to Online Store > Themes > Edit Theme.
Navigate to the page template where you want the proof (e.g., Product Page).
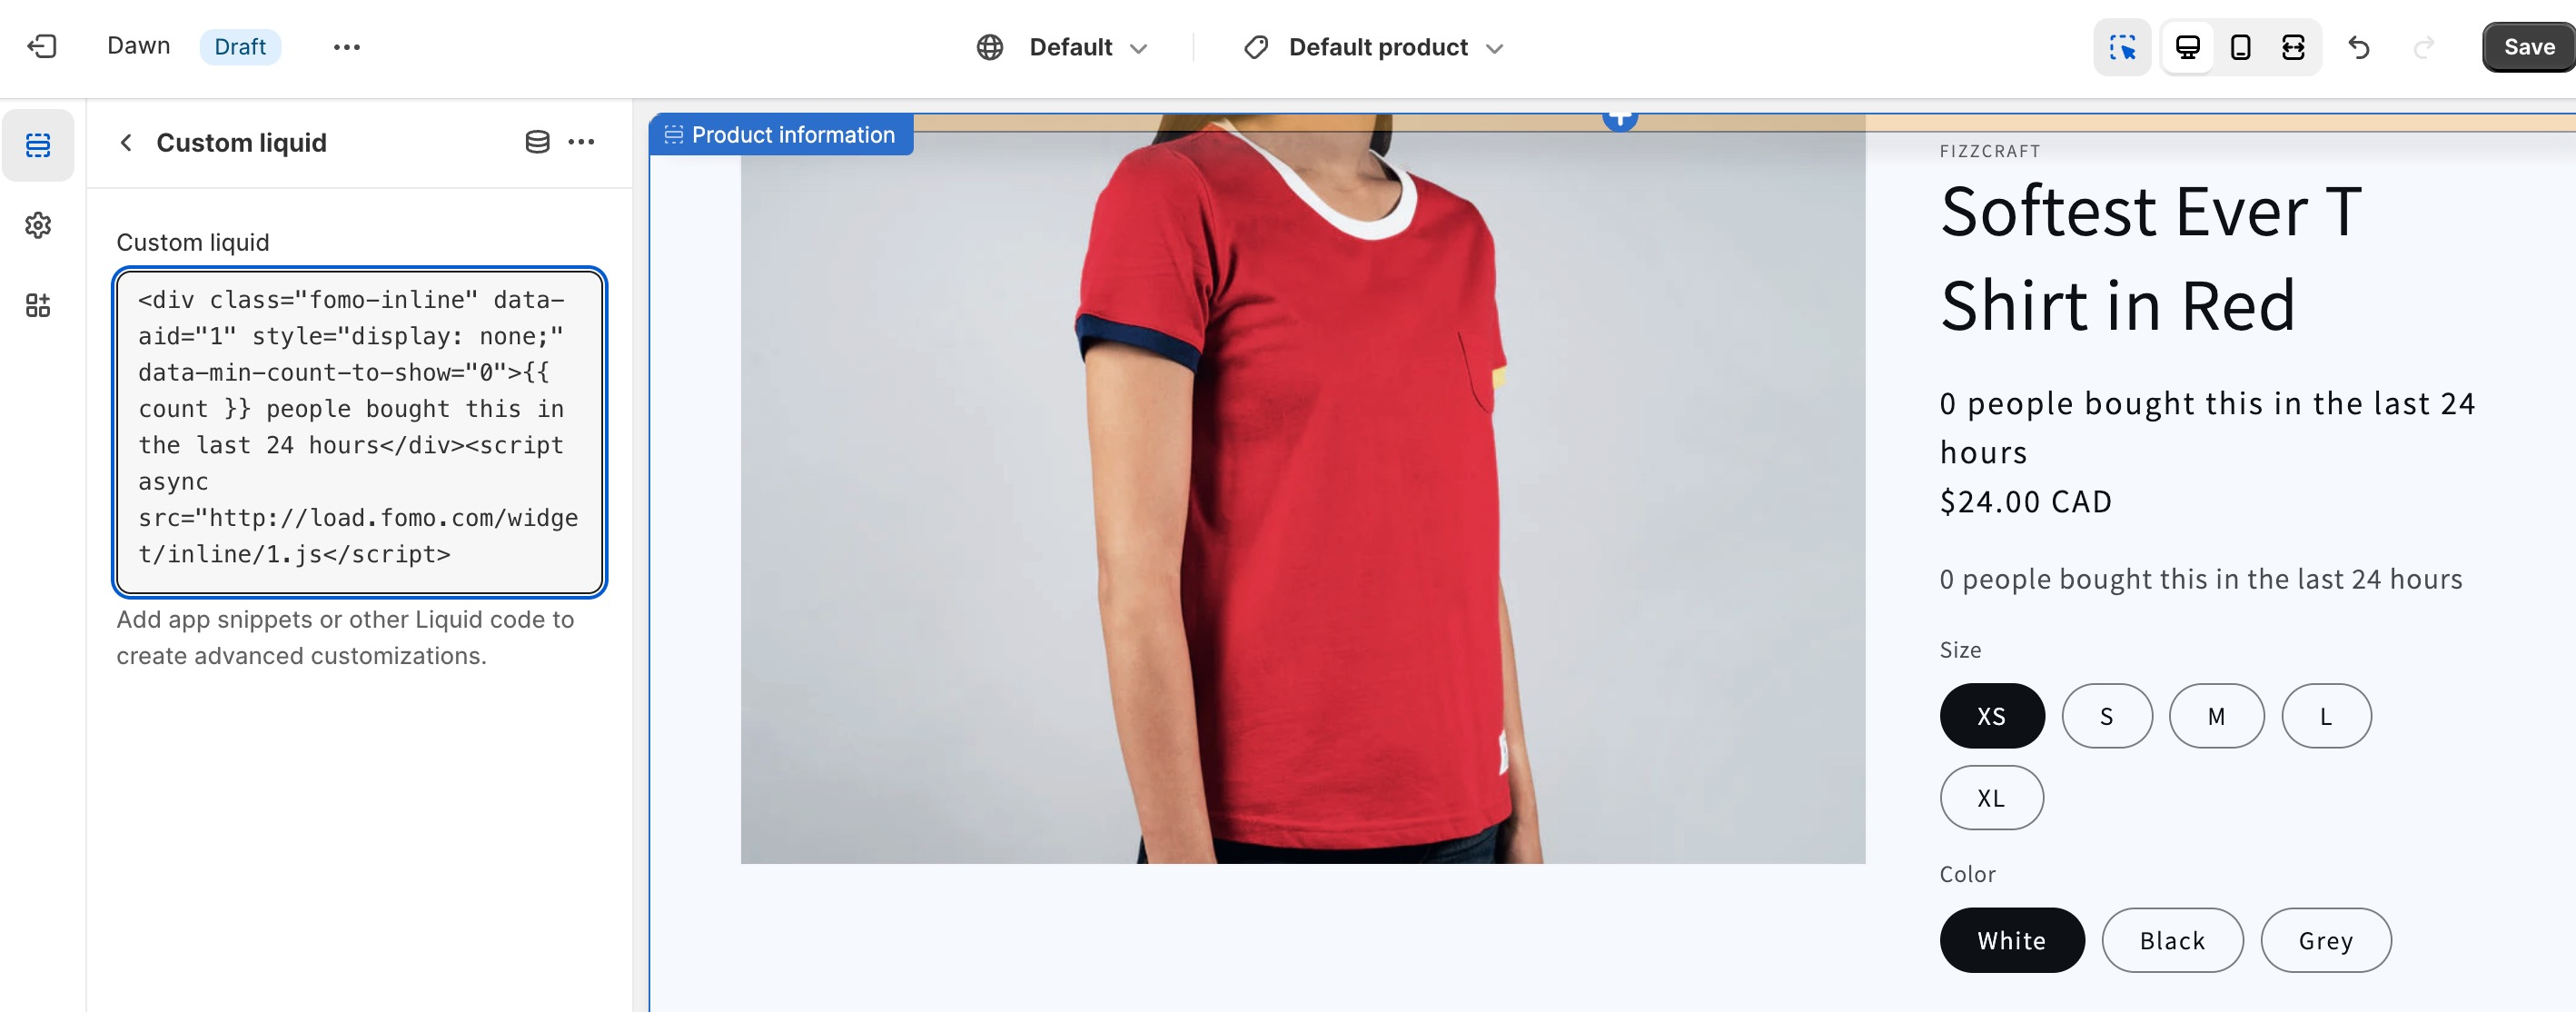
- Add a Custom Liquid or Custom HTML Block
-
Liquid blocks expect liquid code and may cause rendering errors with HTML snippets. You can use them just learn how first.
-


These next steps are needed only if you don't see the Custom HTML block option then you might need to create one yourself if not skip to the 3rd step.
- Open the Code Editor: Go to Online Store > Themes. Click the three dots (...) next to your active theme and select Edit code.
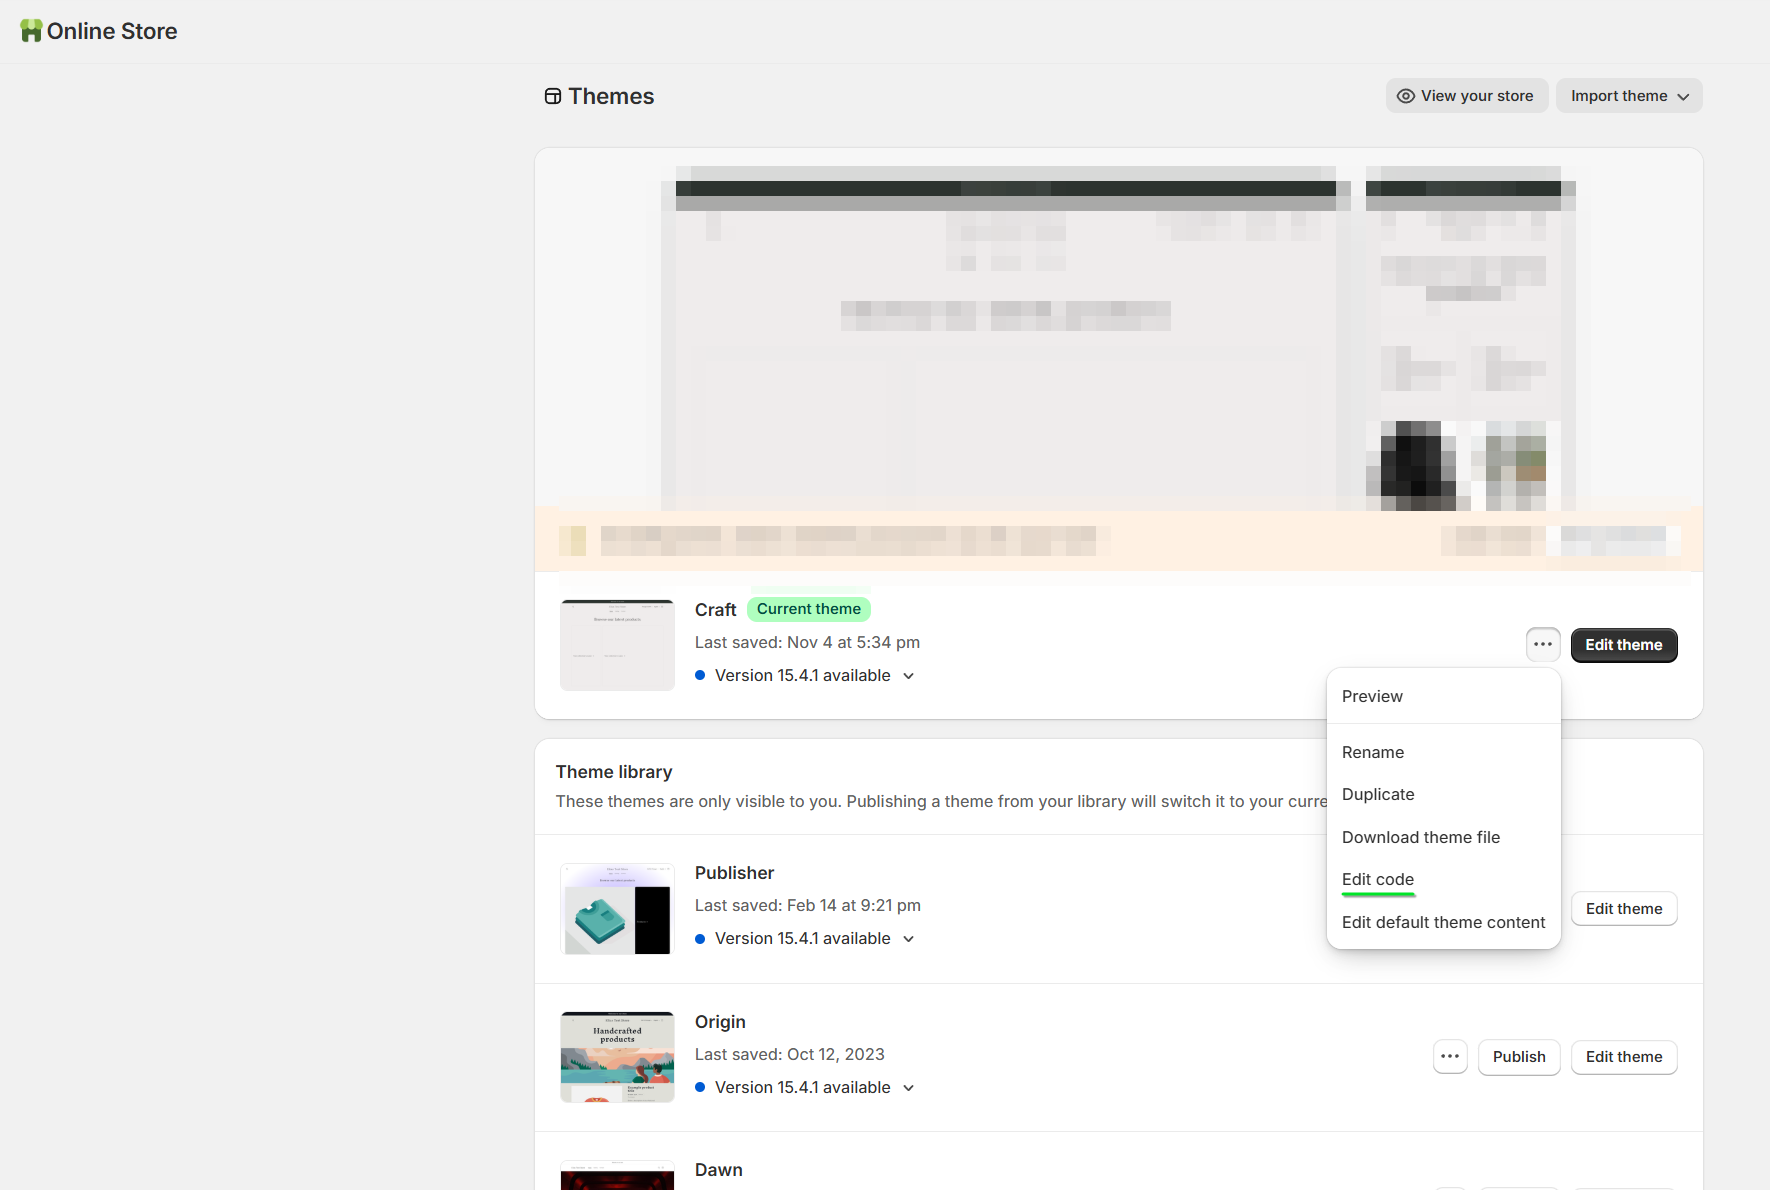
Add a New Section File: Scroll down to the Sections folder and click Add a new section.
- In the filename box, type:
custom-html-fomo - Ensure the dropdown/extension is set to .liquid.
- Paste the Schema Code: Delete everything in the new file and paste this:
<div class="custom-html-section">
  {{ section.settings.custom_html_code }}
</div>

{% schema %}
{
  "name": "Custom HTML Fomo",
  "settings": [
    {
      "type": "html",
      "id": "custom_html_code",
      "label": "HTML Code",
      "default": "<p>Paste Fomo Code Here</p>"
    }
  ],
  "presets": [
    {
      "name": "Custom HTML Fomo"
    }
  ]
}
{% endschema %}
- Save and Use: Click Save. Now, when you go to your Theme Customizer, you can simply search for "Custom HTML Fomo" under Add Section.
📖 Official Shopify Documentation
For more on why the .liquid file structure is necessary and how sections work, check out the developer docs👉
3. Paste your snippet and save!
Consider that Shopify rendering can be tricky it might not load here on the preview so make sure to open another tab with your store in the product page and refresh until you are able to see it.
When doing this, make sure you set data-min-count-to-show to 0 so you can see the inline text on the page while testing it.
For BigCommerce Users
-
Navigate to Storefront > Design > Page Builder.
-
Drag an HTML Widget to your desired location.
- Paste the snippet and save. Note: This requires a basic understanding of your store's environment. If you're a beginner, reach out to Fomo Support or BigCommerce support for help.
If you add the Active Visitors Inline code to your site, the live Active Visitors notification will be turned off. You can turn it back on under Integrations if you want to have both versions visible.
Going forward, the selected Fomo message will show up as text on your site in the exact location where you've placed the script!
The #{{ count }} variable updates from our server each time a visitor loads the page.
🎨 Advanced Customization & Styling
Please note that display: none is there for a reason. We will switch this property to display: block once the data is loaded fully from our server on our side.
Otherwise, there would be an empty box while the message was loading.
Add Emojis & Style
You can add emojis directly or via Hexadecimal code (e.g., 🔥 for 🔥). You can also use CSS to change colors and borders.
If you are having trouble rendering them on your store try using Hexadecimal code instead like follows:
🔥
You can also bold the entire message using <strong> </strong> tags,
As you can tell by now it means that you can add different styles options like background color for example padding, border radius and more see the example:
<div class="fomo-inline" data-aid="00000" style= "display: none;" ; background-color: #94a3b8 !important; padding: 12px 16px !important; border-radius: 6px !important;" data-min-count-to-show="1>
🍪{{ count }} people bought this in the last 24 hours
</div>
<script async src="https://load.fomo.com/widget/inline/0000.js"></script>

If you need help with additional custom styling chat with a support specialist.
❓ Frequently Asked Questions (FAQs)
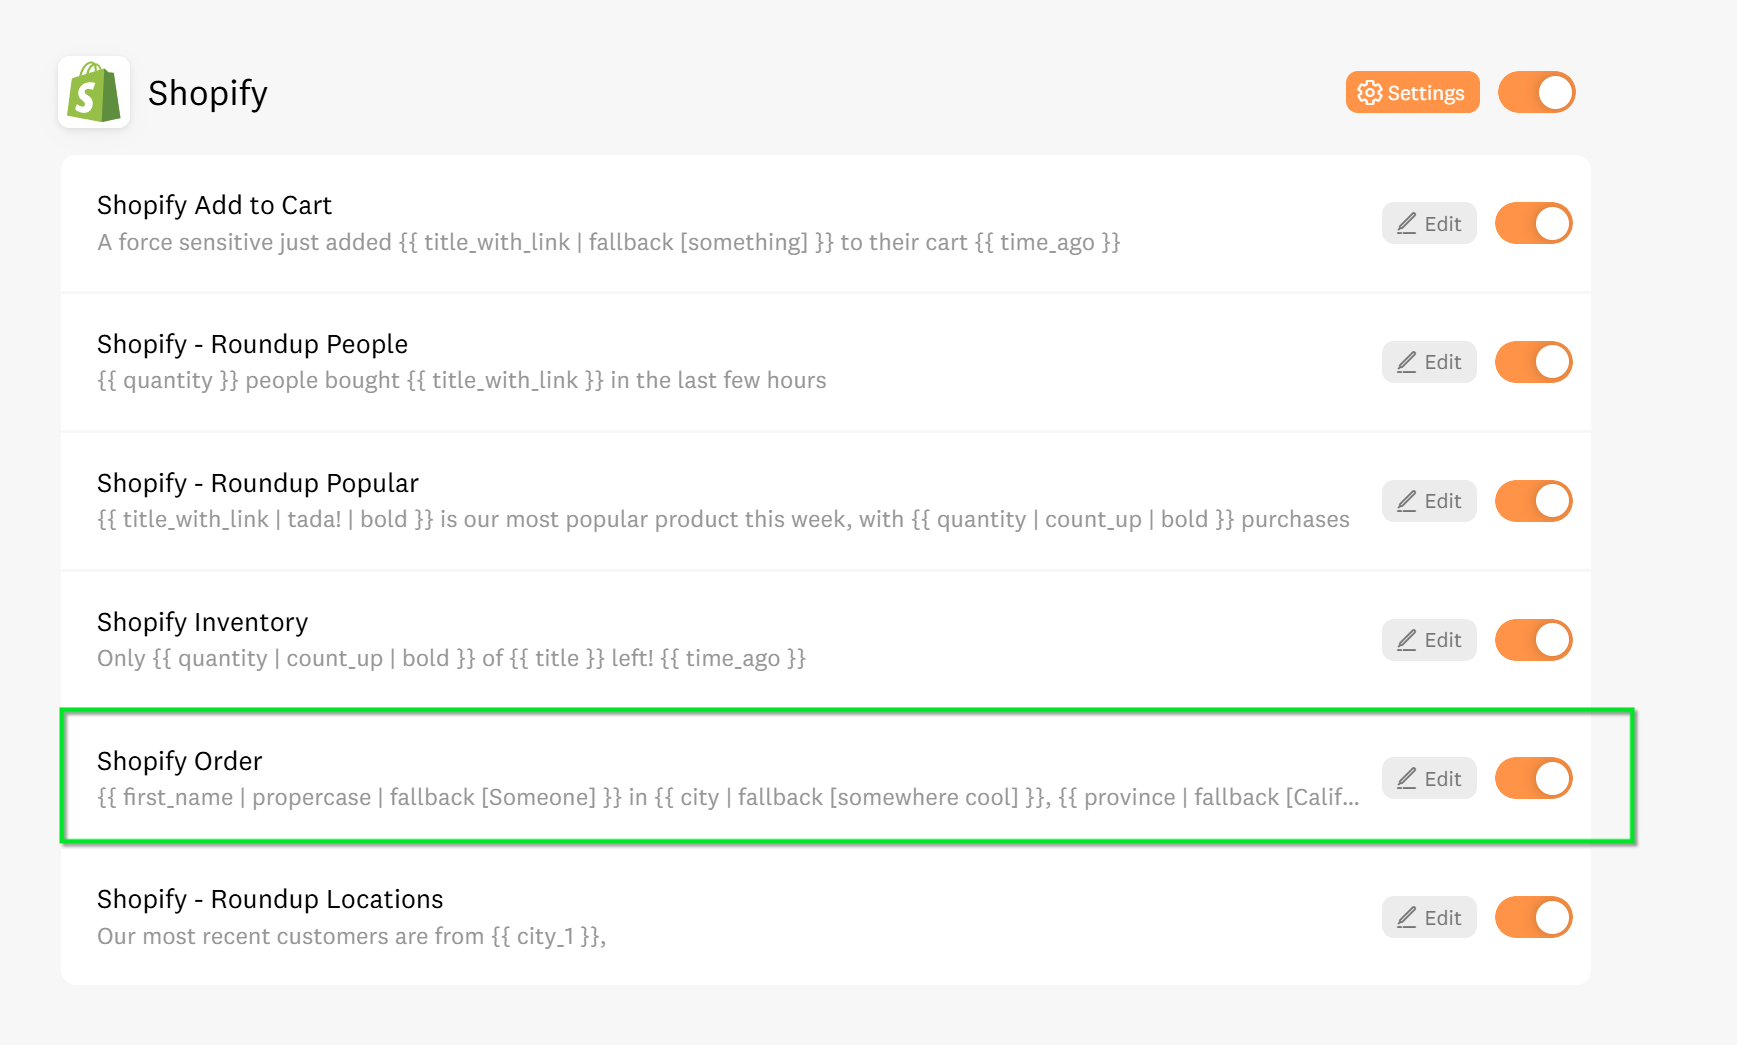
My Page Stream is empty! Why?
Page Stream starts counting from zero the moment you connect it. It typically takes 24 hours to build enough data to show a count. Also, ensure your Shopify Integration is Active and the Shopify Order Template is ON, as Page Stream pulls data from there.
Same for BigCommerce make sure both the integration and the bigcommerce order notification are on.
if you don't want to display the Shopify Order Notifications there are a few workarounds to hide it you can either:
- Use Page Rules to hide that template,
- Use Flows to Create a Default Flows that doesn't includes that notification,
- Reach out to Support and we will offer you alternatives,
[Shopify Only] How do I avoid "Double Counting"?
If you have both "Orders" and "Add to Cart" enabled, Page Stream might combine them, inflating your numbers.
Fix: 📝 Here’s what to do:
Decide which event type you want to show Shopify Order, Shopify Add to Cart events or any notification from the list,

Select it and click Save to apply!
And that is it from now on Page Stream will count only events coming from that specific Template.
The URLs don't match!
Keep in mind our script matches the URL of the visitor's current page with the URL variable for your Events. If URLs don't match, Page Stream won't work.
You can check whether your URLs match by going to your Events tab, hovering over one event, and clicking "edit". You'll see the URLs we capture for each event under "event URL". These URLs must match what the visitor sees in their browser when they are visiting your product page.
It’s still not rendering on Shopify? This is often a Liquid conflict. Use the "Raw Wrap" to tell Shopify to ignore the code: {% raw %}<div class="fomo-inline" ...></div>{% endraw %}
How are Fomo Inline impressions counted?
- There is one Fomo Inline message per page load. So, each page load counts as 1 impression. You can check out total impressions on your Dashboard.
I am not able to see my Inline Notification and I followed all the steps from before (Shopify Users Only)
Remember that you are adding a Custom HTML code into Liquid, so you might encounter rendering issues, so first double check as follow:
-
Check that you set the minimum value to display to 0
-
Make sure that you double check your notifications settings, meaning:
Active Visitors what is the counter period,
Page Stream have I enabled everything as mentioned before do I have recent orders captured, did I wait for the 24 hours that we recommend after adding the PageStream Inline
Custom Roundups what is my source template is it the correct one is that template actually collecting data
Now if you have indeed checked on all of this and you are still not able to see it rendered on your store, then it probably means that you will need to add the raw endraw wrap around it, if you want to know more about the raw wrap and how does it work you can follow the Shopify Dev documentation here
Now try adding it to the Inline as follows in the example:
{% raw %}<div class="fomo-inline" data-aid="785655" style="display: none;" data-min-count-to-show="0">
{{ count }} people bought this in the last 24 hours!
</div>{% endraw %}
<script async src="https://load.fomo.com/widget/inline/785655.js"></script>
This approach might have as consequence that the message you had on you integration message box might not render into the html code snippet so you might instead make the message modifications directly on the Inline snippet code.
🚀 Expert Support for Our Premium Clients
Fomo Inline is a sophisticated move. If you are on a custom theme or a high-volume BigCommerce store and things aren't looking quite right, don't guess ask.
-
Email us: hello@fomo.com
- White-Glove Setup: . We will jump on a call, share screens, and help you embed your social proof with surgical precision.Pick the day and time here.